Customizing with WooCommerce Page Builders
It takes a lot to stand out in the competitive ecommerce marketplace. In addition to offering great products, store owners need to create attractive and functional websites to win over buyers. This takes considerable work, especially if you try to build these sites from scratch. With WooCommerce page builders, you get an efficient tool for streamlining the web design process.
In this post, we’ll examine how WooCommerce page builders can benefit your business and how to set up different parts of your store using a few popular solutions.
Why you might need a WooCommerce page builder
WooCommerce wage builders are useful tools that help you create websites without the need for coding knowledge or technical expertise. Most page builders come with collections of pre-made modules that you can easily add to your web pages, and they typically use visual editors with simple drag-and-drop functionality.
Since each page is nothing more than a grouping of different elements, this approach simplifies the process of designing your site.
You get to choose exactly which elements to include on each page and can re-arrange and style them without limit.
People with more experience creating websites from scratch sometimes criticize page builders, believing that their functionality is limited. And that their use by many site owners often leads to cookie-cutter designs.
However, while page builders might have been more limited in the past, today they are highly flexible tools that even experienced creators can find value in. Here are some of the key reasons to use a WooCommerce page builder to design your store:
More control
WordPress theme editors come with limited options for customizing your pages. If you have some technical expertise you can dive into the code to create the design that you need but this takes work and time.
Page builders, on the other hand, give you a blank canvas for adding whatever you want to your pages. This is invaluable to ecommerce, where the slightest difference in your frontend experience can lead to significant differences in results.
Ease of use
Code is the foundation of all websites. Thousands of lines of it are needed to ensure a site works properly. Because of this, creating a website completely from scratch is time consuming and takes a lot of work. A content management system (CMS) like WordPress eliminates the need to code every detail yourself, but often requires additional input when you want to create a custom design.
With a page builder, you get both ease of use and simpler customization.
There are pre-built modules that remove the need to create each component from scratch and all changes happen before your eyes. This gives you complete control and you always know exactly what your designs will look like.
Efficiency
In addition to making the website-creation process easier, page builders are also highly efficient. Instead of spending weeks or months to create a site, you can have a quality end product within a few days — or even hours.
With a page builder, you can create and save templates that can easily be reused across your site.
The block-based, drag-and-drop functionality helps you design more quickly, as you can see the changes as they are being made. Plus, many page-building apps include advanced modules like countdown clocks, related products, and other elements that would be hard to program independently.
Improved mobile experience
It’s no secret that the mobile shopping experience is a big part of selling online. Many consumers shop using their mobile devices and expect a quality experience that mirrors that on a desktop. Most WordPress themes are responsive and mobile-friendly, but they do not give you the ability to create unique designs for mobile pages
With a page builder, you can determine exactly how your pages look on different devices. They allow you to set different designs for each device to adjust elements that would otherwise not be compatible.
Top WooCommerce page builders
There are plenty of third-party solutions for building pages in WooCommerce. Below, we will look at several WooCommerce page builders and how you to use them to create pages and templates to enhance your store.
Elementor
Elementor is the most popular WordPress page builder. It works well with most themes, including those designed specifically for WooCommerce. The platform works using content blocks known as elements. You can drag these to the page editor and modify them to see changes in real-time.
Among the array of elements are several options for WooCommerce stores. Some of the most useful WooCommerce modules include :
- Product title
- Product images
- Product price
- Product rating
- Product categories
- Cart
- Checkout
- My account
- Breadcrumbs
- Related products
Elementor has both a free and paid version. Most of the Woo-specific modules are only available with the Pro version of Elementor. Elementor Pro also provides more robust template functionality. You can use these to design unique product and shop pages and then set conditions to let the plugin know on which of your pages to use them.
You can create your own layout using the WooCommerce widgets or use one of the pre-made templates.
There are several useful extensions for adding extra widgets to Elementor. For example, the Essential Addons for Elementor plugin comes with dozens of elements such as Woo Checkout and Woo Cart that you can add to your Elementor pages.
Creating a custom checkout page with Elementor
The checkout experience is vital to a successful ecommerce store. With Elementor, you can replace the default checkout page with an easy-to-follow and attractive checkout flow that leads to fewer abandoned carts and more sales for your business.
For this example, we will use the Woo Checkout element from the Essential Addons for Elementor.
When you first set up the plugin, you get to choose which elements to enable. They are divided into different sections based on category. Scroll down to WooCommerce Elements.
Woo Checkout will be disabled by default. Enable it along with Woo Cart, and then select Next to finish setting up the plugin.

After the addons are in place, you’ll want to create a template in Elementor. This way, you can make changes over time and then instantly add them to your active Checkout page when they are ready to publish.
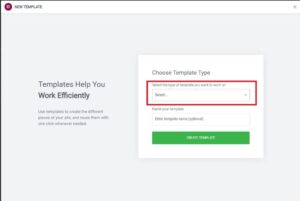
Go to Templates, and then select Add new. This will open a window to select the type of template. Select Page and give your template a name before clicking Create Template.

This will generate a draft of the template and take you to the Elementor editor. The left-hand menu contains the elements that you can drag and drop onto your page design. Enter “Woo” into the search field and the plugin will filter the elements to only show matching results.

Select Woo Checkout and drag it to the box that says Drag widget here.

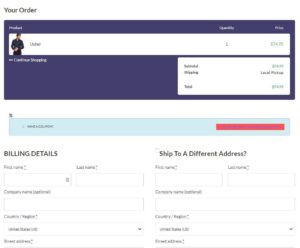
When you add the widget, you’ll see the following default layout:

To customize the design according to your needs, select the widget and go to editor in the left-hand menu. Start with the Content tab to input the wording that appears on the page.
In the General Settings section, you’ll see options for defining the checkout steps. The one-step (page) checkout will work for most stores. With the Pro version, you change the checkout to a multistep. The multi-step split layouts also come with extra styling options to further enhance your checkout experience.
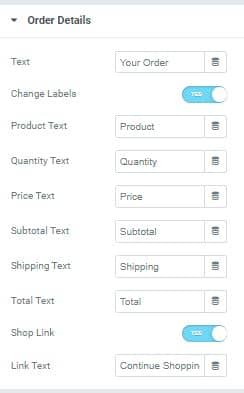
In the Order Details section, you’ll have the option to change the values for the price, products, quantity, total, and shipping. You can also enable or disable a continue shopping link that directs users back to your storefront.

Style your checkout page
After you modify the content, the next step is to style the checkout experience to match your branding. Select Style from the Elementor menu. From there, you’ll be able to set the typography and color for different sections. Any changes you make will be reflected in the page editor in real-time so that you can get an accurate picture of the new design.
When you are finished styling the checkout page, save the changes and preview the final version before selecting Publish.
Change the checkout page
After you design your new checkout page, you need to replace the default checkout. Go to WooCommerce > Settings > Advanced. From here you can choose the new checkout page from the drop-down menu.

Divi
Divi is a powerful WooCommerce page builder with an extensive set of features. There are both frontend and backend editors along with plenty of pre-built modules, making it easy to add certain elements to your pages. Some of the Divi WooCommerce modules include:
- Product sections
- Product prices
- Product galleries
- Product ratings
- Add to cart buttons
With the platform, you can modify existing layouts or create new ones from scratch that can be used as templates and then applied as the new default for specific pages.
Creating a custom product page with Divi
There are two ways to create a new template for your WooCommerce product pages. You can choose one of your individual product pages or you can edit the global body for your product page template.
We recommend starting with a single page as you can review the changes to ensure they are in order before applying them to every product on your site.
In addition to page builder functionality, Divi also serves as a WordPress theme. As such, you’ll need to have the theme enabled to use the page builder.
After you download the theme from the Divi website, go to Appearance > Themes > Add New to upload and activate the theme. Installing the theme will also install the Divi Builder which you will use to customize your product pages.
Once this is done, go to one of your product pages to begin editing the layout. Change the page layout to full width and select Build on the Front End to open the Visual Builder.
Inside the Visual Builder, you’ll see all the WooCommerce elements that you can customize the design. This includes:
- Woo Breadcrumb
- Woo Add to Cart
- Woo Description
- Woo Meta
- Woo Tabs
Start by opening each module and customizing the fonts and text color to match your store’s branding. Also make sure to edit the Add to Cart button color to something that will stand out and capture your visitors’ attention.
Once you’ve finished the product page design, save the layout to your Divi Library to be able to reuse it. You can then trun the design into a template. To do so, go to Divi > Theme Builder and select Add New Template.

In the Use On tab, select All Products to apply the template to each of your product pages.

Click on Add Global Body and select the layout you just saved to your Divi Library. Once you save the template, you can check one of your products to ensure that has been applied.
Closing thoughts on WooCommerce page builders
WooCommerce page builders are incredibly useful tools. With some know-how, you can build stylish and highly functional websites, saving valuable time in the process. You don’t need to touch a line of code but still get the ability to customize your designs down to the slightest detail. By doing so, you can create a store that stands out and ultimately wins more buyers.


